How to Replace a Tap Aerator & Fix Low Water Pressure
Summary: A tap aerator is a small mesh nozzle threaded onto the end of your kitchen or bathroom mixer tap. When it becomes choked with hard water limescale or pipe debris, it severely restricts your water flow. Swapping it for a replacement is a fast, inexpensive 5-minute DIY fix that instantly restores your tap’s pressure.
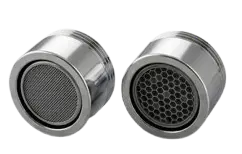
What Does a Tap Aerator Actually Do?
In modern UK plumbing, tap aerators (also known as flow regulators) serve three main purposes:
- Shape the Flow: They mix air into the water stream to create a smooth, splash-free column of water.
- Filter Debris: The internal mesh acts as a secondary filter, catching rust, grit, and dislodged limescale from your pipework.
- Save Water & Energy: By aerating the water, they increase the perceived water pressure while reducing the actual volume of hot water used, helping lower utility bills. You can easily test your baseline flow rate using a flow measure jug before and after replacing the aerator.
Common Signs of a Blocked Aerator
If you live in a hard water area (common across southern and eastern England), calcium carbonate will eventually build up inside the mesh. If you notice issues across multiple taps, you might need to troubleshoot further—such as checking if your water pressure drops at night. However, for a single problem tap, look out for:
How to Replace a Tap Aerator (Step-by-Step)
Replacing an aerator is a beginner-friendly plumbing task. You will need a dry cloth, a replacement aerator pack, and possibly a pair of adjustable grips or a spanner if the old one is seized.
-
Step 1: Unscrew the Old Nozzle
Grip the metal ring at the tip of the tap spout. Turn it anti-clockwise by hand to loosen it. If it’s stuck with limescale, wrap a rag around the metal to protect the chrome finish, and gently loosen it with a spanner or water pump pliers.
-
Step 2: Inspect and Empty
Take the housing completely off the tap. You will likely find grit or white limescale flakes inside. Push out the old plastic mesh cartridge and discard the old rubber washer. Wipe the internal threads of the tap spout clean with a damp cloth.
-
Step 3: Insert the New Parts
Place the new plastic mesh cartridge into your metal aerator housing, ensuring it sits flat. Place the new rubber washer on top of the cartridge. Note: The rubber washer is essential to prevent water leaking from the sides of the thread.
-
Step 4: Reattach and Test
Thread the newly assembled aerator onto the tip of the spout. Turn it clockwise until it is hand-tight. Turn on your water to test the pressure and ensure there are no drips coming from the housing joints. If you notice a tiny weep coming from a worn tap thread, wrapping the thread with PTFE tape can help secure a watertight fit.
💡 Pro Tips for Buying & Fitting
- Male vs. Female Threads: Check your tap before buying! A "Male" aerator has threads on the outside and screws up into the tap spout. A "Female" aerator has threads on the inside and screws over the tap spout.
- Standard UK Sizes: The most common UK tap sizes are M24 (24mm) for Male threads and M22 (22mm) for Female threads. Measure the diameter across the base with a ruler before ordering.
- Hand-Tighten Only: Do not use a spanner to heavily tighten the new aerator. Overtightening will crush the rubber O-ring seal and cause side-leaks.
Where to Buy Replacement Aerators in the UK
If you cannot salvage your current mesh, replacement packs are incredibly cheap (typically costing between £3 and £8). They usually come as multi-packs with fresh rubber sealing washers included. You can find them at local hardware stores or online.
| Retailer | Stock Status | Benefit | Link |
|---|---|---|---|
| Screwfix | In Stock | Adaptor Kit for Tap | View Range |
| Toolstation | In Stock | Adaptor Kit for Tap Conversions 1/2" to 3/4" | Check Stock |
| Amazon | In Stock | Tap Aerator M24 Male Thread | Check Stock |
Frequently Asked Questions (FAQs)
How do I clean a tap aerator without removing it?
If your aerator is seized tight, you can descale it in place. Fill a small plastic food bag with white vinegar, submerge the end of the tap into the vinegar, and secure the bag around the spout using an elastic band. Leave it to soak for 1 to 2 hours. Remove the bag and run the hot water to flush out the dissolved limescale.
Why is my tap aerator stuck?
Aerators generally become stuck due to severe limescale bridging the metal threads. Spraying a dedicated limescale remover or wrapping a vinegar-soaked cloth around the joint for 30 minutes can break down the calcium. Once softened, use grips over a towel to twist it anti-clockwise.
Do I need a special tool to remove a tap aerator?
Most standard aerators can be removed by hand or with standard pliers. However, "hidden" or flush-fitting aerators (commonly found on modern designer bathroom taps) require a specific plastic aerator key to unscrew them. These keys are usually provided when you purchase the tap, or can be bought cheaply online.