Condensate Pipe Insulation – Stop Winter Boiler Failures
If your boiler stops working during a cold snap, the culprit is often a frozen condensate pipe. Proper insulation acts as a protective "jacket" for your external waste pipe, preventing ice blockages and ensuring your home stays warm when you need it most.
Why Insulation is Critical
UK condensing boilers produce a small amount of water that must drain away. Without thick, UV-resistant insulation, this pipe is your boiler's weakest link:
- Prevent Lockouts: Stops ice from backing up into the boiler and triggering emergency shut-offs.
- Weatherproof Protection: Quality "Class O" rubber insulation resists rain and sun damage better than standard foam.
- Save on Call-outs: Prevents the #1 reason for emergency heating engineer visits during British winters.
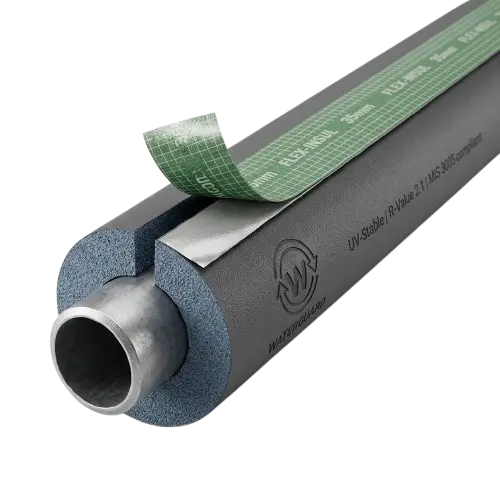
Understanding the Setup: Pipe vs. Insulation
It is important to distinguish between the waste pipe itself and the protective cover.
Where to Buy Condensate Insulation in the UK
For external use, you must buy UV-resistant, weather-proof lagging. Indoor grey foam will degrade quickly in the elements. Expect to pay £5 to £15 per 2-metre length.
| Retailer | Stock Status | Recommended Product | Link |
|---|---|---|---|
| Screwfix | In Stock | Essentials Insulation 22mm x 13mm | View Range |
| Toolstation | Available | Rubaflex Self Seal Class | Check Price |
| Amazon UK | In Stock | Armaflex 15x9 Black | View Details |
How to Insulate Your Condensate Pipe
You can easily install insulation yourself. It is a vital DIY task to complete before the first frost hits the UK. Ensure you use the correct diameter (usually 32mm for external runs).
Remove Debris
Wipe down the external plastic pipe with a damp cloth to remove dirt or algae. This ensures the insulation fits snugly and helps any adhesive tape bond properly.
Full Coverage
Measure the entire length of the pipe from where it exits the wall to the drain. Cut the lagging using a sharp utility knife. Note: Ensure you cover the elbows and joints, as these are the most common freezing points.
The "Jacket" Method
Most external lagging is "pre-slit." Open the slit and slide it over the pipe. If yours is not slit, you will need to cut it down one side. Make sure the slit faces downwards to prevent rainwater from sitting inside the insulation.
Weatherproofing
Use UV-resistant black cable ties every 300mm to hold the insulation in place. Do not over-tighten, as crushing the foam reduces its insulating properties. Use waterproof "duct tape" on the joints for extra protection.
The Exit Point
Ensure the insulation goes right up to the wall. Use a bit of external-grade silicone sealant or a dedicated wall cover to make sure no cold air can get behind the lagging where the pipe exits the house.
💡 Expert Tips for UK Winters
- Thickness Matters: Industry standards (MIS 3005) recommend a minimum of 19mm wall thickness for external condensate pipes.
- Trace Heating: In extremely exposed areas (like the Scottish Highlands), consider "trace heating" – an electric cable that keeps the pipe warm.
- Emergency Fix: If your pipe is already frozen, pour warm (not boiling) water over the pipe to melt the ice, then dry it and insulate immediately.